
使用 client-go 开发 controller
client-go 介绍
github地址:https://github.com/kubernetes/client-go/
client-go 是 Kubernets 官方提供的 go 语言客户端库,Kubernets 内部也使用该库进行通信,此外诸多基于 Kubernets 的第三方开发也使用该库,比如 etcd-operator 或者 prometheus-operator等。
client-go 当前版本是 6.0,支持到 Kubernets 1.9 版本。6.0 版本的变化情况可以参见官方blog 的文章Introducing client-go version 6,版本管理遵循 语义化版本 2.0.0
库的整体目录:
- The
kubernetespackage contains the clientset to access Kubernetes API. - The
discoverypackage is used to discover APIs supported by a Kubernetes API server. - The
dynamicpackage contains a dynamic client that can perform generic operations on arbitrary Kubernetes API objects. - The
transportpackage is used to set up auth and start a connection. - The
tools/cachepackage is useful for writing controllers.
Compatibility matrix
| Kubernetes 1.4 | Kubernetes 1.5 | Kubernetes 1.6 | Kubernetes 1.7 | Kubernetes 1.8 | Kubernetes 1.9 | |
|---|---|---|---|---|---|---|
| client-go 1.4 | ✓ | - | - | - | - | - |
| client-go 1.5 | + | - | - | - | - | - |
| client-go 2.0 | +- | ✓ | +- | +- | +- | +- |
| client-go 3.0 | +- | +- | ✓ | - | +- | +- |
| client-go 4.0 | +- | +- | +- | ✓ | +- | +- |
| client-go 5.0 | +- | +- | +- | +- | ✓ | +- |
| client-go 6.0 | +- | +- | +- | +- | +- | ✓ |
| client-go HEAD | +- | +- | +- | +- | +- | + |
Key:
✓Exactly the same features / API objects in both client-go and the Kubernetes version.+client-go has features or API objects that may not be present in the Kubernetes cluster, either due to that client-go has additional new API, or that the server has removed old API. However, everything they have in common (i.e., most APIs) will work. Please note that alpha APIs may vanish or change significantly in a single release.-The Kubernetes cluster has features the client-go library can’t use, either due to the server has additional new API, or that client-go has removed old API. However, everything they share in common (i.e., most APIs) will work.
| client-go 3.0 | Kubernetes main repo, 1.6 branch | = - |
|---|---|---|
| client-go 4.0 | Kubernetes main repo, 1.7 branch | ✓ |
| client-go 5.0 | Kubernetes main repo, 1.8 branch | ✓ |
| client-go 6.0 | Kubernetes main repo, 1.9 branch | ✓ |
| client-go HEAD | Kubernetes main repo, master branch | ✓ |
Key:
✓Changes in main Kubernetes repo are actively published to client-go by a bot=Maintenance is manual, only severe security bugs will be patched.-Deprecated; please upgrade.
推荐使用 glide进行管理:
先编写一个简单样例程序,如官方提供的在集群外访问集群内部pod程序:
1 | $ glide init |
最后生成的样例如下:
1 | package: github.com/DavadDi/k8s-client-go/out-of-cluster-client-configuration |
更多的方式可以参见 INSTALL
如果在集群内部作为 Pod 使用样例参考:in-cluster-client-configuration ,如果运行在集群外部 out-of-cluster-client-configuration
Visit k8s Cluster Resource
样例代码:
1 | package main |
TODO: 完整代码样例
Visit List/Watch k8s Cluster Resource
对于 Kubernets· 中 Pod、Endpoints、Service、Namespace的 ListWatcher 的使用,可以参见 Kubernets DNS相关的实现细节 kube-dns 中 pkg/dns/dns.go , coreDNS k8s plugin。
1 | package main |
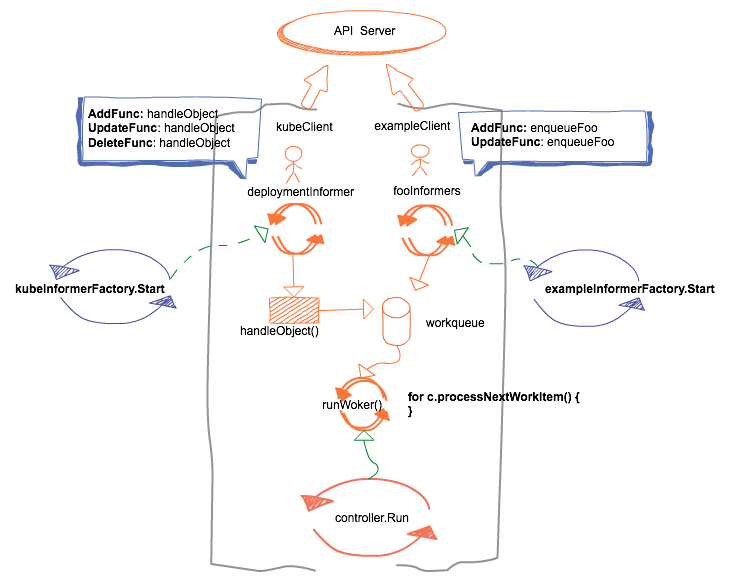
Sample Controller CDR
sample controller: github 地址: https://github.com/kubernetes/sample-controller,k8s 社区对于开发 Controller 也形成了一套 Pattern,具体参见:https://github.com/kubernetes/community/blob/8cafef897a22026d42f5e5bb3f104febe7e29830/contributors/devel/controllers.md
程序整体框架图:
sample controller running:
1 | # assumes you have a working kubeconfig, not required if operating in-cluster |
此外由于 sample-controller 不同的分支,crd.yaml 文件注册的 apiVersion 可能不同,当 apiVersion 与 代码中的访问版本不匹配的时候,也不能够正常访问。例如 sample-controller 1.9 分支中 apiextensions.k8s.io/v1beta1, 那么代码中访问代码为
c.kubeclientset.AppsV1().Deployments(foo.Namespace).Create(newDeployment(foo)), 在 1.10 中 apiVersion 变为了 apiextensions.k8s.io/v1,所以需要特别注意。
Kubernets API访问模型
REST API 是Kubernetes 的基石,所有的操作和通信都是通过 API Server来处理调用的。
API versioning
Kubernetes 支持多版本 API,每个在不同的路径上比如:/api/v1 或者 /apis/extensions/v1beta1.
API 版本依次演进: Alpha(v1alpha1) -> Beta(v2beta3) -> Stable(vx)
API groups
API groups 主要目标是将单个 v1 API 接口按照细粒度的分组进行组织,方便与单独的启用或者停用,在不同的 groups 上支持不同的版本,可以独自演进,具体参见 api-group.md。
当前使用的 API Group如下:
Core (legacy) group,
/api/v1, apiVersion: v1两种使用方式:
- http://127.0.0.1:8001/api/v1/pods List 集群范围内的全部pod
http://127.0.0.1:8001/api/v1/namespaces/soa/pods/authhttp-57d998968d-hn5zb 某个命名空间下的pods或者单个pod
1
2
3
4
5
6
7$ kubectl proxy
$ http://127.0.0.1:8001/api/v1
{
kind: "APIResourceList",
groupVersion: "v1",
resources: [xxxx]
}
Named groups are at REST path
/apis/$GROUP_NAME/$VERSION, and useapiVersion: $GROUP_NAME/$VERSION(for example,apiVersion: batch/v1).- 查看 apis
1
2
3
4
5
6
$ http://127.0.0.1:8001/apis 可以查看到 APIGroupList
{
kind: "APIGroupList",
apiVersion: "v1",
groups: [xxxx]
}
- 查看 apis
xxx
当前有两种支持的方式来扩展 API:
自定义资源(CustomResourceDefinition),主要用于简单的 CRUD;早期版本叫做ThirdPartyResources
,1.7版本引入 Alpha, 1.8 版本 Beta, 自定义资源必须实现 runtime.Object 接口,可以借助 k8s.io/code-generator 来实现相关代码生成,具体可以参见 openshift 的样例仓库: openshift-evangelists/crd-code-generation
进行中的 API Server 扩展功能,通过 aggregator 来进行分发,对于客户端透明;
Controlling Access to the Kubernetes API
一个 API 的路径上回经历不同的验证阶段,目前主要有三个阶段如下图:

Authentication
详细的各种类型认证参见 Authenticating. 该阶段主要是对于用户传递的用户名密码、证书、 Plain Tokens、Bootstrap Tokens和JWT Tokens(service accounts)的合法性进行检查。如果认证失败,则返回 401;如果用户认证成功,用户被认证为特定的 username, 用于后续的验证步骤,Kubernets 仅仅使用 username 用于访问的控制,内部并不存在对应的 user 对象来保存,也不保存 username 相关的信息。
Authorization
在此阶段,一个请求必须包括请求的 username、action以及 action 影响到的资源对象。如果当前存在策略允许用户具备权限完成对应的操作,那么授权则通过。
如果 Bob具备以下的策略:
1 | { |
那么以下的访问则可以通过授权:
1 | { |
Kubernets 支持多种授权模块:比如 Node、ABAC、RBAC 和 Webhook 方式。使用的授权模块可以在 API Server启动的时候进行指定,参数 --authorization-mode=。Kubernets 会依次检查设置的授权模块,如果任何一个能够满足授权需求,则通过,如果所有的授权模块都不满足,则会拒绝请求,返回403禁止访问。更加详细的介绍参见 Accessing Control Overview
Kubernetes reviews only the following API request attributes:
- user - The
userstring provided during authentication. - group - The list of group names to which the authenticated user belongs.
- “extra” - A map of arbitrary string keys to string values, provided by the authentication layer.
- API - Indicates whether the request is for an API resource.
- Request path - Path to miscellaneous non-resource endpoints like
/apior/healthz. - API request verb - API verbs
get,list,create,update,patch,watch,proxy,redirect,delete, anddeletecollectionare used for resource requests. To determine the request verb for a resource API endpoint, see Determine the request verb below. - HTTP request verb - HTTP verbs
get,post,put, anddeleteare used for non-resource requests. - Resource - The ID or name of the resource that is being accessed (for resource requests only) – For resource requests using
get,update,patch, anddeleteverbs, you must provide the resource name. - Subresource - The subresource that is being accessed (for resource requests only).
- Namespace - The namespace of the object that is being accessed (for namespaced resource requests only).
- API group - The API group being accessed (for resource requests only). An empty string designates the core API group.
| HTTP verb | request verb |
|---|---|
| POST | create |
| GET, HEAD | get (for individual resources), list (for collections) |
| PUT | update |
| PATCH | patch |
| DELETE | delete (for individual resources), deletecollection (for collections) |
kubectl 提供 子命令 auth can-i 来快速验证,使用 SelfSubjectAccessReview API 来确定当前用户是否具备某些操作。例如:
1 | $ kubectl auth can-i create deployments --namespace dev |
也可以通过创建 Kubernets 资源的方式来使用:
1 | $ kubectl create -f - -o yaml << EOF |
Admission Control
Adminssion Control 模块可以修改或者拒绝请求。除了 Authorization 模块涉及的属性外,Adminssion Control 模块还可以访问创建或者更新的对象内容。模块会对创建、删除、更新、连接(代理)的对象产生租用,但是不包括读取操作。Adminssion Control可以配置多个,按照顺序依次调用。
与 Authentication 和 Authorization 模块不同,如果任何Adminssion Control模块拒绝,则该请求立即被拒绝。除了拒绝对象之外,Adminssion Control还可以为字段设置复杂的默认值。更加具体的介绍参见 Using Admission Controllers 章节。一旦请求通过了所有Adminssion Control,就会使用相应API对象的验证进行验证,然后写入对象存储库(如步骤4所示)。
1 | $ kube-apiserver --enable-admission-plugins=NamespaceLifecyle,LimitRanger ... |
1.9 版本以上推荐使用的列表如下:
1 | --admission-control=NamespaceLifecycle,LimitRanger,ServiceAccount,PersistentVolumeLabel,DefaultStorageClass,DefaultTolerationSeconds,MutatingAdmissionWebhook,ValidatingAdmissionWebhook,ResourceQuota |
Adminssion Control 过程分两个阶段进行。 在第一阶段,运行突变(mutating)准入控制器。 在第二阶段,验证(validating)Adminssion Control 运行。 某些控制器两个阶段都有。
由于早期模型存在以下限制:
必须编译到 kube-apiserver中
只能在 apiserver 启动的时候配置
为了提升 Admission Control的灵活性,从 1.7 版本开始,提供新的特性 Initializers and External Admission Webhooks, 允许admission controllers 可以在外部进行开发,在运行时候进行配置,具体参见 Dynamic Admission Control, 1.9 版本中 Admission Webhooks (beta in 1.9) and Initializers (alpha)。
admission webhooks: http回调地址,接受 admission 的请求并处理相关请求内容,有两种类型: ValidatingAdmissionWebhooks 和 MutatingAdmissionWebhooks。具体样例可以参考:caesarxuchao/example-webhook-admission-controller, 样例程序展示了一个如何通过 admission controller 来限制用户只能从特定的 Docker Registry Repo 下载镜像。
CRD
创建和管理CRD的client库位于:https://github.com/kubernetes/apiextensions-apiserver
API server for API extensions like CustomResourceDefinitions
It provides an API for registering
CustomResourceDefinitions
一开始我一直很执着地认为 CRD 的注册函数应该位于 client-go 这个库中,而且官方提供的 controller-sample 也只是演示了如何通过 k8s.io/code-generator 进行生成 CRD 客户端读取代码,样例中的资源创建都是通过编写 yaml文件,通过 kubectl 来进行创建的,主要演示步骤如下:
1 | # assumes you have a working kubeconfig, not required if operating in-cluster |
后来参考了一个 operator-kit (A library for creating a Kubernetes Operator),提供 sample-operator 中进行 CRD 注册的部分也是采用的 apiextensionsclient "k8s.io/apiextensions-apiserver/pkg/client/clientset/clientset" 来进行连接并调用:
1 | APIExtensionClientset.ApiextensionsV1beta1().CustomResourceDefinitions().Create(crd) |
我曾经尝试将 apiextensions-apiserver/pkg/client/clientset/clientset 与 client-go 原生的连接进行共同使用,也就是想通过 apiextensions-apiserver 来进行创建CRD,而同时使用 client-go 提供的客户端功能进行读取,结果就遇到包依赖的各种问题,真正原因是: apiextensions-apiserver 底层也依赖于 client-go, 如果我们的程序同时使用 apiextensions-apiserver与client-go会造成资源定义位于不同的包,从而报错:
1 | graph TD; |
直到后面我看到 Including CRD client into client-go repo #247, 才明白两者当前是分开实现的,如果同时使用的话则会造成包依赖出问题。
databases-crd.yaml
1 | apiVersion: apiextensions.k8s.io/v1beta1 |
1 | $ kubectl get crd databases.example.com -o yaml |
1 | apiVersion: apiextensions.k8s.io/v1beta1 |
1 | $ curl http://127.0.0.1:8001/apis/example.com |
为新创建的 CRD 创建一个实例
1 | $ cat wordpress-database.yaml |
1 | $ kubectl create -f wordpress-database.yaml |
1 | $ kubectl get databases.example.com |
1 | $ curl http://127.0.0.1:8001/apis/example.com/v1/namespaces/default/databases |
1 | $ curl http://127.0.0.1:8001/apis/example.com/v1/namespaces/default/databases/wordpress |
基于 CRD 开发的 Controller 一般称作 Operator, 简单样例参见 Rook 的具体样例 https://github.com/rook/operator-kit/tree/master/sample-operator
快速搭建 minikube 环境
当前 minikube 0.25.2 , k8s支持 1.9.4
minikube-darwin-amd64 0.25.2,命令行安装:
1 | curl -Lo minikube https://storage.googleapis.com/minikube/releases/v0.25.2/minikube-darwin-amd64 && chmod +x minikube && sudo mv minikube /usr/local/bin/ |
参考
- 语义化版本 2.0.0
- Kubernetes Deep Dive: Code Generation for CustomResources
- Kubernetes deep dive: API Server – part 1
- Kubernetes Deep Dive: API Server – Part 2
- Kubernetes Deep Dive: API Server – Part 3a
- Extend the Kubernetes API with CustomResourceDefinitions
- Extending Kubernetes 101
- 开发operator扩展kubernetes 调研整理 Github 地址
- An Introduction to Extending Kubernetes with CustomResourceDefinitions
- Operator kit: Library to create a custom controller
- localkube consumes CPU when system is “idle” #1158
- Extend Kubernetes 1.7 with Custom Resources 仓库 https://github.com/yaronha/kube-crd
除特别声明本站文章均属原创(翻译内容除外),如需要转载请事先联系,转载需要注明作者原文链接地址。